Browse using the new Vinous website now. Launch →
Printed by, and for the sole use of . All rights reserved © 2015 Vinous Media
Fall-Off-The-Fork Braised Pork Shoulder
BY ERIC GUIDO | MAY 29, 2020
Low and Slow is the name of the game.
When I search to see how other cooks prepare braised pork shoulder, it amazes me how many home chefs rush the process and miss out on the fall-off-the-fork goodness that a perfectly braised pork shoulder should deliver. It took me a long time to bend my brain around the fact that the more connective tissue a piece of meat has, the longer it should cook. However, the temperatures need to be low, and the type of cooking should include moist heat. In fact, there are many chefs that will bring the oven temperatures down even further than I do and braise for hours on end. Why? Because pork shoulder, also referred to as pork butt, is a lot like a brisket or a primal leg cut; it’s well-muscled through heavy use, but the meat is also extremely flavorful. What we need to do to get at that flavor is to break down the tissue that holds the meat together, hence the fall-off-the-fork tenderness that you get when it’s cooked properly.
To take things to another level, I also start this recipe the night before I cook it with a dry rub, the secret weapon of any master of the low-and-slow cooking method. You see, as the dry rub pulls moisture out of the meat, what it leaves in its place is flavor.
Lastly, we’ll dress the pork with some flavorful braised and roasted vegetables, as well as make a sauce from the same liquid we used to braise the meat. Basically, you’re making an entire meal in one pot, which also saves a lot of time.
Oh, and if you have leftovers, fear not because sitting in the braising liquid overnight will only further intensify the flavors.

The video tutorial is packed full of hints and tips to cook the perfect Fall-Off-The-Fork Braised Pork Shoulder.
Ingredients You’ll Need:
The rub:
1 tbsp garlic granules
1 tsp cumin
1 tsp paprika (sweet or smoked)
1 tsp magic mushroom powder
1 tsp salt
The braise:
3 - 3 1/2 lbs. boneless pork shoulder (pork butt) – If using bone-in, increase cooking time by one hour.
1 onion (quartered)
3-4 carrots (chop to bite size pieces)
3-4 stalks of celery (chop to bite size pieces)
5 garlic cloves
4 cups stock
1 tbsp apple cider vinegar
2 sprigs of rosemary
Salt and pepper to taste
Wine Pairings:
Mature Sangiovese - Featured: 2001 Il Poggione Brunello di Montalcino. Find it on Delectable.
Young Sangiovese - Featured: 2018 Il Poggione Rosso di Montalcino. Find it on Delectable.
Syrah - Featured: 2016 Domaine Combier Crozes Hermitage Clos Des Grives. Find it on Delectable.
Chardonnay - Featured: Featured: 2017 Domaine Pierre Boisson Bourgogne Blanc. Find it on Delectable.
Share your own wine pairings on Delectable and check out what others have paired with Braised Pork Shoulder.

The Process: The Day Before
1. The day before you plan to braise the pork shoulder, assemble the rub in a bowl.

The salt and spices used as the dry rub will pull liquid out of the pork shoulder and pull back in flavor from the seasonings.
2. Place the pork shoulder on a cutting board, and with a sharp knife, trim away any excess fat. You want to keep a layer of fat on the pork shoulder, but trim down any thick pieces.

Use your hands to rub the seasoning mix into the pork shoulder.
3. Sprinkle the rub over the pork shoulder, and rub it into the meat, making sure to get a consistent covering.

Wrap the pork shoulder in plastic wrap and place in the fridge overnight.
4. Wrap the pork shoulder in plastic and place it in the refrigerator overnight.
The Process: The Next Day
5. The following day, take your pork shoulder out of the refrigerator about 1 hour before you plan to start cooking (about five and a half hours prior to when you want to serve your meal). Place it on the countertop uncovered. You’ll notice that the rub has pulled a lot of juices from the meat, which is to be expected.
6. Set your oven to preheat at 250 degrees. Place a heavy gauge stainless steel pot, roasting pan, or Dutch oven over a medium-high flame, and allow it to heat. Also, have a plate or aluminum foil-covered sheet pan ready on the side.

To avoid smoking in the pan, do not pour the oil directly into the pan, instead pour the oil over the top of the meat and rub in with your hands. This will sear the meat without frying the meat.
7. Season the pork shoulder liberally with salt and pepper and pour a small amount of cooking oil (avocado or grapeseed oil works well) over the pork shoulder, and rub it in with your hands.
8. Place the pork shoulder in the cooking vessel and sear for about two minutes on each side.

Make sure the pork shoulder is touching the pan on all sides and sear for two minutes per side.
9. Once done, remove the meat from the pot and place on the plate or sheet pan you have on the side.
10. Immediately add your vegetables to the pot. Stir around to dislodge any cooked-on pieces of fond. The vegetables should sweat for about two to three minutes.

Immediately after removing the meat from the pan, place the vegetables in the pan allowing them to sweat and pick up the fond or the burnt on pieces left over from the seared pork.
11. Add your pork shoulder back to the pot, and pour your stock in around it. You want the stock to come up about halfway around the pork shoulder.
12. Bring this mixture up to a simmer, then place your rosemary sprigs on top of the pork shoulder.

The broth should come up about halfway around the pork shoulder.
13. Cover the pot with a lid or tightly-fitted piece of aluminum foil and place into the middle of your oven, which should be fully preheated to 250 degrees. Set your timer for 1 ¾ hours.
14. When the timer goes off, remove the pork shoulder from the oven. Gently turn it over in the pot, then place it back into the oven for another 1 ¾ hours.
15. Once completed, remove the meat from the oven and increase the oven temperature to 300 degrees.
16. Move the pork shoulder to a cutting board to rest for 30 minutes, lightly covered in aluminum foil.

Remove the vegetables from the liquid and place on a tray lined with aluminum foil and a rack from the oven.
17. Move the braised vegetables from your pot onto a foil-lined sheet pan with a rack and then place back into the oven.
18. Next, ladle the braising liquid through a chinois, fine mesh sieve or cheesecloth, then into a fat separator, and allow it to cool for ten minutes.

Strain the broth to separate the fat from the liquid.
19. Once cooled, pour the braising liquid into a sauté pan over a medium flame, making sure to leave any of the separated fat out of the mix. The goal is to reduce by half.

Plate the vegetables onto the platter with room for the meat in the middle.
20. Once your pork shoulder has fully rested, remove the vegetables from the oven and place them around the rim of a serving platter.
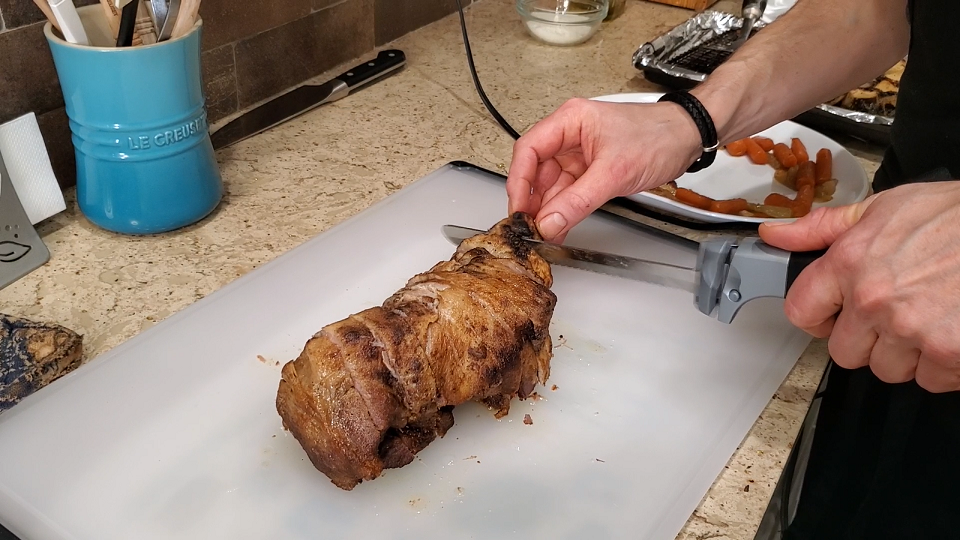
Using a sharp carving knife or electric carving knife, slice your pork shoulder into your desired portion sizes.
21. Using a sharp carving knife or electric carving knife, slice your pork shoulder into your desired portion sizes and move them to the platter as well.
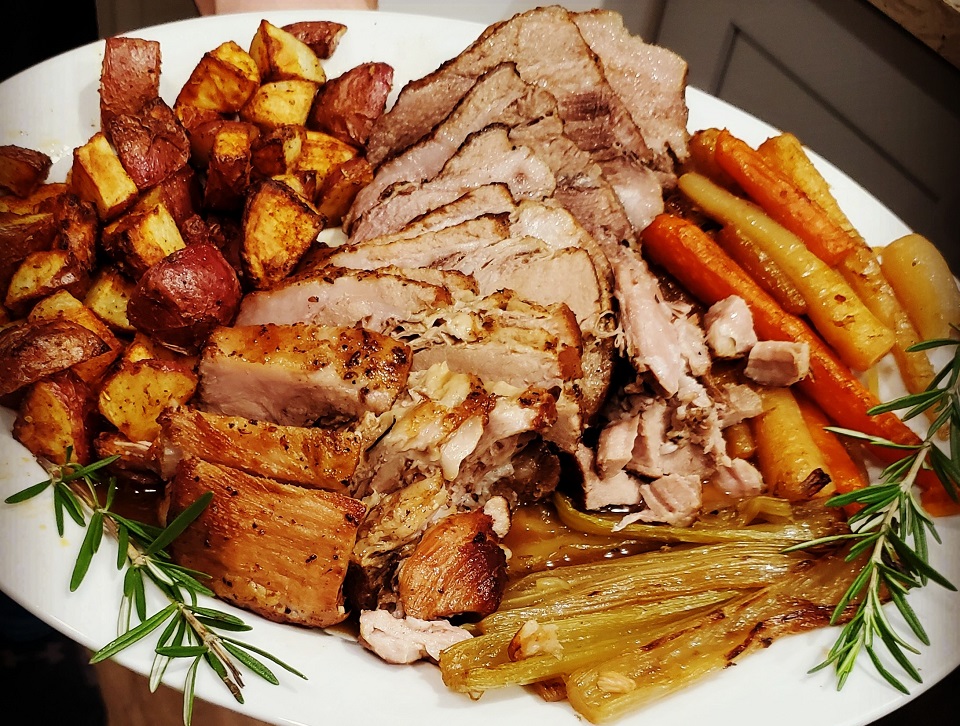
Garnish with fresh rosemary and serve.
22. Ladle the reduced sauce over the meat and vegetable garnish with fresh rosemary and serve.